Read more HERE ...


...wanderings down the creative path wherever it may lead ... whatever it may be - the current project or interest from the Mountaintop Quilting Studio ...

 Isn't this the prettiest sampler quilt? I love
the fabrics Lynn chose for her blocks and the center medallion being set off
with the jewel points of gold is perfect. Check out those multi-colored corner
triangles. How absolutely perfect to pull everthing help each of the fabrics
pop. And Lynn made the perfect choice when she picked the border and "plain"
block dark batik fabric to complement the primary color tone on tones.
Isn't this the prettiest sampler quilt? I love
the fabrics Lynn chose for her blocks and the center medallion being set off
with the jewel points of gold is perfect. Check out those multi-colored corner
triangles. How absolutely perfect to pull everthing help each of the fabrics
pop. And Lynn made the perfect choice when she picked the border and "plain"
block dark batik fabric to complement the primary color tone on tones.


 Susan's plans are to use this quilt on her bed during the month of February. How perfect is that since this quilt looks to me just like chocolate covered cherries or strawberries dipped in chocolate. I would never have thought to use this color combination which just goes to show there is inspiration no matter where you look (or taste LOL).

 First ... let's take a look at those quilts I teased you with yesterday. I promised more pictures of the customer quilts I've been working on, so, here they are! Jill has been bringing her quilt tops to me for her for several years now. Jill used to be a fabric rep for a fabric company and found herself with yards and yards of samples when she retired. Jill makes the best use of a variety of fabrics in her quilts of most any one I know in the quilting world. She has a real eye for color and manages to put just the right little bit of zing in simple traditional quilt patterns.
 uilt. Some quilters refer to this kind of quilting as border-to-border quilting.
 The weather is a mystery to me. I posted another rose picture to remind me that we had sunshine and warmer temperatures (still way below normal) but warmer than today and certainly dryer. We got all the way up to 47 today plus rain - the Oregon drizzly kind. Our snow levels are so low the state road department got the snow plows out again. 14" of new snow in the mountains this time of year surely must be some kind of record. But, it was nice on Sunday. Should have planted my geraniums and tomatoes then instead of quilting! But, onto other more pleasant things.
ALMOST THERE #1 ... I can't believe it isn't midnight yet and I'm all packed and ready to head for the airport. Usually when I have an early morning flight across country I will just stay up all night. Helps me throw my body clock off and I don't suffer from from jet lag. I'm usually asleep before we even lift off the runway! Crossword puzzles saved up from the last few days are packed; ipod is loaded with books, grandbaby photos, and a tune or two; got my Starbucks card loaded and ready to be whipped out on my stop in Phoenix; got everything we need to make the baby quilt for Eryn's friend; what am I forgetting? Hmmmm, scary thought when I think everything of any real importance is all ready to go in the bags.
ALMOST THERE #2 ... what's been on the machine? I've been working on Ruth's Double Wedding Ring quilt. First, I must say, Ruth, you did a great job with the piecing. Your quilt top just rested on the batting so nice and flat and square. Not easy to do with all those bias and curved edges. I worked out some great tips to streamline the quilting process with a Double Wedding Ring. I'll be doing a short workshop with the gals in Sisters, Oregon during our retreat this summer in July. Creative Studio, our new software update for our Statlers, makes the project much easier and much more accurate that it has been in the past.

Here's a tip for "toppers/piecers" and longarmers when you have a Double Wedding Ring quilt project:
Have the quilter baste down the edges of the outside bands and drop the quilting motifs in the melons and center areas. This should keep the costs for the quilting at a reasonable rate because no quilting has been added to the bands. I charge at a medium custom rate for this service. If I had added the ditch quilting to the bill, the pricing would have gone to the high end or heirloom quilting rates.
The piecer can then do the quilting in the ring areas. Many times they are quilted with stitch in the ditch to define those boundaries. Whether quilting is added in each of the little ring patches is up to the piecer. This kind of ditch quilting is done much more easily on the domestic sewing machine than on the longarm and can easily save the piecer quite a bit of money on the quilting bill.
ALMOST THERE #3 ... my list of "chores" to finish up before I leave are almost finished. Just a few things to finish cleaning up in the kitchen. Let the dogs out one last time for the night. Last thing to take care of ... a couple of reminders for you readers.
If you're a Statler quilter you'll want to be sure and "get your name in the hat" the the drawing for a free edge-to-edge design at the end of this month. It's easy - click on "post a comment" at the end of any post to enter the drawing. You don't even have to comment on the post - you can just say, "Put my name in the hat!" Right now, if no one else posts a comment you have a 50/50 chance of winning. Pretty good odds.
Also, remember to post your vote regarding the poll for this month regarding music playlist widgets on blogs. You'll find the poll at the top of the sidebar.
Have a great week from now until next Wednesday. I have no idea how my posting time will be. I will have my laptop with me and I usually work and keep up with my emails during Eryn's practice time. She as to keep her lip up and her fingers agile for her bassoon performances. I do remember her making reference to some trim in the guest room that needed finishing. Oh dear, sounds like another ALMOST THERE.


 day of cutting, piecing, and computers.
 and piecing blocks. I need a total of 48 blocks for a twin size quilt. Sometimes I don't like knowing I need 96 two inch squares with lines drawn on the diagonal ready to complete sew-n-fold corners. I sorted the patches and blocks in sets of twelve blocks so the numbers wouldn't be quite so overwhelming. I have 20 blocks more than half finished so there is hope, but I still have a lot of triangles to prep before I can sew!

 e-to-edge we've all loved to use so far has morphed into a new pattern with the addition of stars scattered randomly through the ripples. The new Ripples and Star pattern is on sale for the next week until June 15th for half price to celebrate Flag Day.


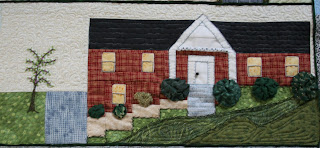


 I started with completing the obvious ... the sky areas and the grass or ground areas. The houses were a little more difficult because of the beading and buttons. But the detailing on the houses was so much more defined when I did stitch in the ditch where ever I could. Sue will have a few areas to complete on her own either by hand or with her domestic machine.
 Sometimes the fabric was a good guide in dictating the fill pattern to be used. After I finished all of the sky/ground areas I went back to look at the roof of each house. Sue was very careful to pick fabrics that looked like the actual roofing material of each house. I followed her lead and quilted shakes, shingles, and swirly curvy roofing tiles. It is always difficult to use a two dimensional representation look three dimensional, but Sue did a good job by using proportion and scale, piecing lines, and embroidery stitches, and floss color to help create shadows, forward projecting roof lines, and under eaves areas.
  Sometimes sky fill was easy because of the embroidery Sue had done to begin with. The fireworks in the sky gave me a theme to follow continuing with swirls and "shadow" fireworks. I also created a shadow forest behind the tall evergreen tree on the left to help enhance a single lone tree.
 This building has a wonderful story. It was the only time Sue had to live in an apartment building. The building is located in Chicago ... hence, Lake Michigan in the foreground. And, of course, you'll notice the absence of any green, landscaping, flowers since Sue was living in the "concrete canyons." For one who loves her yard and gardening, the single lone ornamental tree she could see from her second story window was what helped her to keep her sanity.
The other item of interest with this building is an embroidered motif. This logo wasn't really on the side of the building, but Sue added it to help remember the other building tenants and to explain interesting visitors she may have met coming and going from the building. You may have to look closely at the picture on the left side of the building to see the embroidered Play Bunny logo - their headquarters is located in this building in Chicago. No, this is not a giant peach or orange tree with only one orange. Sue could see the town water tower from one of her windows which was painted to look like a peach. What Sue remembers most about this water tower was, if one were approaching from just the right direction ... how much the top of the water tower looked like a bare baby's bottom.
 Ah, Glasgow Kentucky ... where they actually created a mosaic of the town name and the state embedded right into the street!


 A word about the "technicalities" of quilting a piece like this ... I used the very lightest weight thread I could find and quilted right through the cross stitching patterns. I recommend So Fine for the top thread and Bottom Line for the bobbin area to work with minimal thread breaks and tension issues. Both are from Superior Threads.
 ere easy because they are straight lines. I only had to remove ("frogging")the first two longitude lines because the P2P Curve1 didn't stitch the curved line as I had expected. The Pattern Height needed to be increased by 2.5 inches at each repeat to give the increasing curved line as I moved further and further from the center. The only other glitch to deal with was at the very last longitude line for the size of her quilt ... I ran out of throat space. I did have to digitize the to end connections to fill the outer corners.
 ith me to finish for her before Christmas. The quilt is to be a gift for her handyman and as we all know, guy quilts can present challenges in terms of design choices. Darlene looked through the catalog of my designs and made her choices ... for the blocks 1030 Vintage Lily and for the strips and the borders 1082 leaf curl border. We also decided using a wiggly line to "faux ditch" the framing border would be adequate and help keep the cost of the gift within reason.
  easy to drop in beginning with a 45° rotation of the block and remembering to reset the block margin back to a 1/4" all the way around. When I was working with the wholecoth repeating designs I had changed the margin to 1/16" - almost touching but not quite. Too close for a block margin on a pieced quilt. Isn't it great how easily blocks can be re-sized with a computerized quilting system. The blocks in the quilt body were about 9" and the border blocks were about 6".

;)

